
Background
Sunday, October 24, 2010
Lean on Me
Saturday, September 11, 2010
Halloween Cards
I made these Halloween cards for my Etsy shop, using several techniques, including embossing, pen and ink doodling and handmade grungeboard flowers (see tutorial here on my blog)...they were fun to create!


Friday, September 3, 2010
Cardboard Gift Tag
This is a gift tag I created from leftovers in my stash! It's for a contest I put up over at Scrappy Chic Cafe (please come check out the site, you'll find it fun and friendly!)
I stamped an image on a piece of scrap cardstock and attached it and the embellishments onto a piece of a pizza box I had inked with distress ink! Thanks for looking!

I stamped an image on a piece of scrap cardstock and attached it and the embellishments onto a piece of a pizza box I had inked with distress ink! Thanks for looking!

Sunday, August 29, 2010
I Heart My Goddaughter
This is a lyout of my Goddaughter Hannah. She is truly one of the sweetest, gentlist and happiest little girls I know. I used several different brands of paper, including Tim Holtz (the pink music one) and Melody Ross (the scalloped paper around the edges). I also inked and distressed the papers and photo mats. I made the flower from fabric. This was a very fun layout to create...thanks for looking!


Thursday, August 26, 2010
Body Form
I have had an image floating around in my right brain for a while now and have finally put it on canvas. This is an acrylic paint canvas painting that I finished last night. There are parts of it that I'm not crazy about, but for the most part I'm okay with it. (I am my own worst critic I guess)....II did enjoy working on this project though, and can't wait to start another one...I'm considering another Body or Dress Form in a bit of a different style to make this a set. Anyway, I am going to put this piece for sale in my Etsy shop tonite, so if you're interested in purchasing some original art, check it out!
 Thanks for visiting my blog!
 Thanks for visiting my blog!
Monday, August 23, 2010
String Sounds
I have been covered in charcoal and erasure bits and graphite black for days now since my right brain has INSISTED I get my sketch pads and art supplies out! Today this is what I came up with. It's not perfect and I am really having issues with some of it, but I finally just had to walk away from the pad for now! here it is tough, flaws an all!


Love Lives Here
I was inspired by an expensive wall hanging I saw at a department store this weekend to try and make something similar, with less cash out of my pocket! This is what I came up with! It's three dimensional...the ovals are about an inch apart inside the frame around the bejeweled cross.


Friday, August 20, 2010
Acoustic Sound
I've been yearning to get my hands dirty with some paints, pastels or charcoals lately. SO, today I set out to buy myself a new outfit for my birthday tomorrow, but somehow my car drove itself to Michaels instead of the clothing store! hahaha! I wandered over to the art department and bought a giant canvas, a couple of brushes, some paint and an expensive jar of medium! When I got home I decided I needed to do some practicing to get the creative juices flowing, so I ended up doing a charcoal drawing. It isn't my best work, but I did enjoy getting my hands dirty not to mention my face and arms and work table! Charcoal everywhere! Here's what I came up with:
 Thanks so much for visiting my blog!
 Thanks so much for visiting my blog!
 Sunday, August 15, 2010
Scrappy Chic Cafe
I am proud and excited to announce that I am on the Design Team for Scrappy Chic Cafe! the grand opening of this fabulous store/site is today, August 15 at 10:30 am Pacific time (9:30 central). Christine Holleman, owner of the Cafe store and blog, is a good friend and lover of all things scrappy. Please check out the site and join if you like what you see! We are going to have a lot of fun, learn new techniques and find motivation and inspiration at Scrappy Chic and I'm soo happy to be a part of this quickly growing scrapbooking site! Won't you join me??? Click on the Scrappy Chic Cafe on the left of the post and head on over to see what fabulous treats are in store for us!
Monday, August 9, 2010
Beloved
 This is a layout of my Granny. This woman was the center of our family and when she died it changed the lives of all of those who loved her. The small picture was taken in about 1967 and it is of me, my sister Dana and brother Todd. I'm not sure when the bigger photo was taken but I just love it! I used papers from my Swirlydoos August kit for this page, all from Creative Imaginations. I inked the big Prima flower with Broken China Tim Holtz distress ink so it would match the papers. I used a Heidi Swapp distress tool to disress the edge of the background paper, although you cant really see it in this shot. The old camera is a diecut from my stash. Thanks so much for visiting my blog!
Sunday, August 1, 2010
Happy and Sweet
This is a layout I did today of my step grandson Gregory! O heck, he's my GRANDson...I hate the word STEP grandson....he's my son's wife's child and in my son's eye's he is his son....no silly step anything! I love him...he's such a cute, loving little thing... I made the lollipops by punching out circles and cutting them in swirls with scissors. I used pipe cleaners for the sticks. Lots of Martha Stewart supplies here! And I love the Bingo card by Jenni Bolin
 I made the lollipops by punching out circles and cutting them in swirls with scissors. I used pipe cleaners for the sticks. Lots of Martha Stewart supplies here! And I love the Bingo card by Jenni Bolin
Sunday, July 4, 2010
These Boots Were Made For Walking.....
This is a layout I did last night of my daughter on graduation night. It was hot in Victoria, TX where graduation was held so she wore shorts under her graduation robe, AND her cowboy boots! I thought that was so cute, so I took pics!


The pink papers are both from K&Company and the lined paper as well as the small circle is Basic Grey from their Recess pack. I used Walnut Stain distress ink from Tom Holtz to ink all the edges of the papers after I distressed them with Tim Holt sandpaper block. The flourish is Prima as are the flowers. I used my Martha Stewart Monarch Butterfly punch to make the butterflies. The lace strips on the bottom of the photos are from K&Company (an older pack, Sweetheart I think is the name of it). It was so much fun to work on this page! I love distressed paper! TFL!
Together
This is a layout of me, my sister Dana, my cousin Tracey and my brother Todd when we were kids. I laugh every time I see the haircut and my snaggle toothed mouth! LOL
 TOGETHER
 TOGETHER
I lifted a layout of Luzma's for a challenge on scrapbook.com for this page. I used acrylic paint for the orange splotch and to paint the inside of the little wood frame. I will definately be using that technique again! I love the boldness of the paint! The flowers are from Prima. I used alcohol ink to color the bling circle to match the color pallette of the page and I also used the ink to color the wood bird and frame, then I stickled them too. I cut the butterfly out from a Melody Ross pp, folded it upwards to give it dimension. The tag at the top of the page is from Graphic 45 and the TOGETHER tag is from K&Company I think. I enjoyed creating the page alot...love the picture! Thanks for looking!
Monday, June 28, 2010
The Garden
"THE GARDEN"

I decided to paint a picture for my son and daughter in law as a house warming present/birthday present for her. They just bought a home in Colorado and will be moving in July 1. They had just spent three years living in Germany in a gorgeous house with a beautiful yard. I decided to give them a little something to remember that home by, so I painted a picture of the beautiful flower gardent they had in the back yard. This is my take on it:
Sunday, June 20, 2010
Happy Father's Day

This is the card I made for dh for Father's day...I used paper from a paper and diecuts from a Me and My Big Ideas pack. I stamped the Fathers Day sentiment and the flowers/stems on the left. I used Christmas Stickles and Black Diamond Stickles to give the blooms some sparkle. On the inside of the card I placed a strip of rick rack about two inched down from the fold, to match the ribbon on front. Thanks so much for visiting my blog!
Monday, June 14, 2010
Gift from Rebecca

My sweet sweet friend (and Big sister in my secret sister swap) altered a steno pad and made it into a journal for me...I love all the different ribbons on it and the initial is just devine!!! Isn't it beautiful! I'm gonna write letters and do some little sketches/paintings for my grandsons Gregory and Rafe in it for them to read/see when they are much older, and when my grand daughter gets here, I'm going to make a new one similar to it and write letters to her in it too! Thanks Rebecca ! I love it!
Here it is!:
Sunday, June 13, 2010
Haley Jae

So my visit to Houston was almost perfect! I spent a lot of time with my daughters Haley and Alison. We had a great time! They were great sports about me wielding the camera the whole time and we even managed to complete a photo shoot where I got TONS of great pictures of them and us and them with their boyfriends. This layout features one of my favorite pics of Haley from the shoot. I told her to give me a 'pose' and this is what I got! I LOVE it!
The papers and flowers and flourish came from my June Swirlydoos kit Antebellum. I love the papers especially...the feel is elegant/vintage. Love it!!! I completed this layout at a crop I went to Saturday at Paula's place (she has the most PERFECT scrap studio and was a really terrific hostess!)...
After the photo shoot of my girls, I gave the camera to someone else and had him take a few pics of me and Haley and Alison. The last 12 months have been pretty hard on us all, so being able to spend time together and just be HAPPY was wonderful. This layout is the three of us on Sunday, June 6th.

The flower was a gift from Paula (thank you!). She tutored us for a bit at the crop on the flowers so I totally intend to make bunches of them! Thanks Paula!
Thanks for visiting my blog!
Wednesday, June 2, 2010
Home is Where the Love Is

So, tomorrow I pack up my bags and head to Houston! I'm so excited to see everyone! I have a group of wonderful friends that live in my old neighborhood. So, there will be LOTS of girl time and laughs, tears and late night talks. Patty, Sandra, Nancy, Shelly, and Marchel....I love 'em to pieces and can't WAIT to hang out with them in 'my' neighborhood again! My daughter Alison is in Victoria, TX (it's a long story how she ended up there instead of here!) and graduates High School Friday, so my older daughter Haley and I will be going to graduation. I'm sure there will be lots of tears that night because 1. she's my youngest and last child and is already graduating High School! and 2. It's been a VERY long road getting her to this point and I'm sooo very happy and proud of her that she pulled it off!
My older daughter, Haley, who turned 25 years old on Friday lives in Houston, is a full time college student at Sam Houston University and is a manager at Pappadeaux. She has recently moved in with the love of her life (and future husband...no ring yet, but it's just a matter of time), Justin and they are beyond excited about making a home together. SO, I came home last night and banged out this layout for them to hang in their new home...I framed it in a 12 X 12 shadow-type frame...
This page was fun to create...I fell in love with the papers (they are from Anna Griffin and Bazzil Basics), I inked the edges of all of them with Tim Holtz distress ink (some in Faded Jeans and some in Broken China). The flourish is Prima, Say it in Crystals, the yellow flowers (which I also inked with Faded Jeans) were a gift from my sister Dana and the Graphic 45 images to the bottom right are from my secret sister over at scrapbook.com...she also got me the Broken China distress ink, which I LOVE. I cut the two big papers marquee shapes out by hand and the smaller blue one with my Cricut Storybook cartridge. The tiny roses I got from Michaels and I just LOVE them!
I hope her and Justin like it! I know she has some cute yellow curtians that my mom made, so perhaps they'll match their new home's decor!
Thanks for visiting my blog!
Monday, May 31, 2010
Letter To Alison at Graduation

This page is going to be the last in the album. It's a letter I wrote to her. I wanted it to be very simple...just a picture of us and the letter, so this is what I came up with! Journalling letter says:
Journalling letter says:
Alison, May 31, 2010
I wanted to tell you how proud I am of all you've accomplished!
I can't believe you are graduating High School! It seems just yesterday you were calling me Mom-may and sitting in my lap while I read you bedtime stories! I miss those days so much!
You were the cutest, most unique and funny little girl! You kept me and your Dad laughing at your wild imagination every day!
Now you're a young woman with the same wild and crazy imagination, happy spirit and wondrous outlook on life. I hope you'll keep that wherever you go, whatever you do…it's what makes you so special and what I treasure the most about you.
I know we've had some tough times over the years, but through it all, there was never any doubt from either of us that the love was always there. I hope you'll always remember that…LOVE and FAMILY are what make life worthwhile and meaningful.
Remember how we used to lift our arms above our head whenever we drove over a rail road track? Or how we used to open the sunroof on the car, roll down the windows and turn the music (Shania Twain or Michael Jackson!) up full blast and sing as loud as we could get our voices to carry? Remember when we got up in the middle of the night to go for a drive in the Corvette? Or when we'd move the furniture and turn our living room in to a dance floor? Those are the times that are most vivid in my memories…not the hard times we went through together. I hope the same is for you….
Alison, I love you with all my heart. I'm proud of you and I hope you know that I always will, NO MATTER WHAT. You're my daughter, my flesh and blood and you'll always be my little girl.
Seize life! Make it what you always dreamed it could be! This is your chance to move mountains, to be anything and anyone you want to be! Set your goals in front of you Alison, and never ever stop working to reach them! You can do anything or be anything you choose to be! Go for it with all your heart and soul ~ before you know it, you'll have the world by it's tail!
I love you. Congratulations on your High School Graduation!
Thanks for visiting my blog!!!
I Hope You'll Dance
I have been working furiously to get my daughter's graduation album finished! I have two more days and I have to work both of them! I thought surely I could finish today but I'm soo darn picky and slow when it comes to picking out the pps and colors, etc for my pages! I did accomplish two more pages today though, so I'm closer to being done (two more pages to go!). 

This page is called I Hope You'll Dance because I love the lyrics to that song and I thought it was perfect for this layout. alison was the cutest ballerina anywhere....she called herself a 'bowerina', so cute!
Saturday, May 29, 2010
Congratulation on Graduating!

I created this card for my daughter's high school graduation. The inspiration came from the Stamper's Sampler magazine I bought a couple months ago. I enjoyed creating it so much! the sentiment, the birds and the music heart are all stamps. I used Yes Paste to place all the papers (My friend Alda - Flying Unicorn - recommended it and I am soo glad she did...I LOVE it! It's so versatile! Thanks so much for looking!
Alison and Dylan Prom Night

This is a lo I did for Alison's gradution album. I love the way it turned out and am not so sure I can actually part with it....you know how it is! Kids that young, who knows if she'll keep up with the album over the years?! My secret sister on sb.com gave me the Peeled Paint Distress Ink, which I just fell in LOVE with and cant wait to use again!! I punched the flowers with two punches, added the buttons and made the stems with cardstock...This is the first layout where I've sewn most of the paper onto the bg page and I definately will do it again! I LOVE the effect! Thanks for looking!
Friday, May 21, 2010
Crop Time!
I am hosting my very first crop tomorrow at my home and I'm super excited about it! I only have a couple of people coming this time, since it's my first, I thought I'd make it a small one so we can really get into our work and get alot done! thanks so much Paula and Dana for accepting my invite (please feel free to bring along a friend!!)I'm planning some special treats for us to enjoy...appetizers, gift bags, fun fun fun! Can't WAIT! The crop is at my home on Dodson Avenue in Fort Smith, from 10 a.m. to 3 p.m. or until we're done with our projects! See you there!
Saturday, May 15, 2010
Relax

This is a layout I did of my hubby's grandbaby (and mine now!), Emily. We went outside and she immediately jumped up into this chair and assumed the RELAX position! Iused the Cricut Pagoda cartridge to cut the bridge and the big flower. Stickles were fun to use for the stamped flowers, photo corners and little chipboard flower at the top right. Isn't she just the cutest?
Saturday, May 1, 2010
I'm painting again
My two grown children have been harrassing me for years to start painting and sketching again. Because of that, after we purchsed this house that we are renovating, I decided to do some original art to hang. Yesterday I was at Hobbly Lobby looking for an easel when my son called from Germany. He was ecstatic that i was actually buying an easel. I came home and began working on my first painting in years....It was great getting back to a love that I've had buried inside me for too long...
.jpg) I still have a bit of touch up to do, and I need to sign it, but this is what I have done so far.
I still have a bit of touch up to do, and I need to sign it, but this is what I have done so far.
 Here is a close up of the bottom of the painting. I used paint from the can I used to paint my living room for the back ground. It's called Sparkling Lake and I love the color! I will hang this picture in the kitchen to bring the red from the dining room and the Sparkling Lake colors into the kitchen...and tie it all together better. Thanks for looking!
.jpg) I still have a bit of touch up to do, and I need to sign it, but this is what I have done so far.
I still have a bit of touch up to do, and I need to sign it, but this is what I have done so far. Here is a close up of the bottom of the painting. I used paint from the can I used to paint my living room for the back ground. It's called Sparkling Lake and I love the color! I will hang this picture in the kitchen to bring the red from the dining room and the Sparkling Lake colors into the kitchen...and tie it all together better. Thanks for looking!
Saturday, April 24, 2010
Scraproom

So after getting the living room, sitting room and dining room painted, I went to to work on my favorite room! (My scraproom or Happy Place as I like to call it). This room is right off the living room, and I painted it a color called Tropical Bay, which is on the same paint chip as the Sparkling Lake color of the living and sitting rooms. The photo above shows the extra desk I have against the main wall and I display four of my fave pages, which I can change out, between the shelves.
 This is a closeup of two of the shelves I added to the room. I got them for $30 each at Big Lots. The desk I paid $5 for at a garage sale and painted it white.
 This is a view of the wall where most of my embellishments, etc are stored. The little white wood box with the butterfly on it holds my 'blingy' embellishments (like Basic Grey bling pieces for example). The baskets hold brads and Initial 3D stickers. I bought white photo boxes on sale at Michaels for $1.50 and they hold my photos (I have WAY to many photos...I have about 10 of these boxes stuffed FULL of pics).
  This is a rack that was purchased years ago by my sister at a garage sale ($5). I love being able to get to my paper pads so easily.
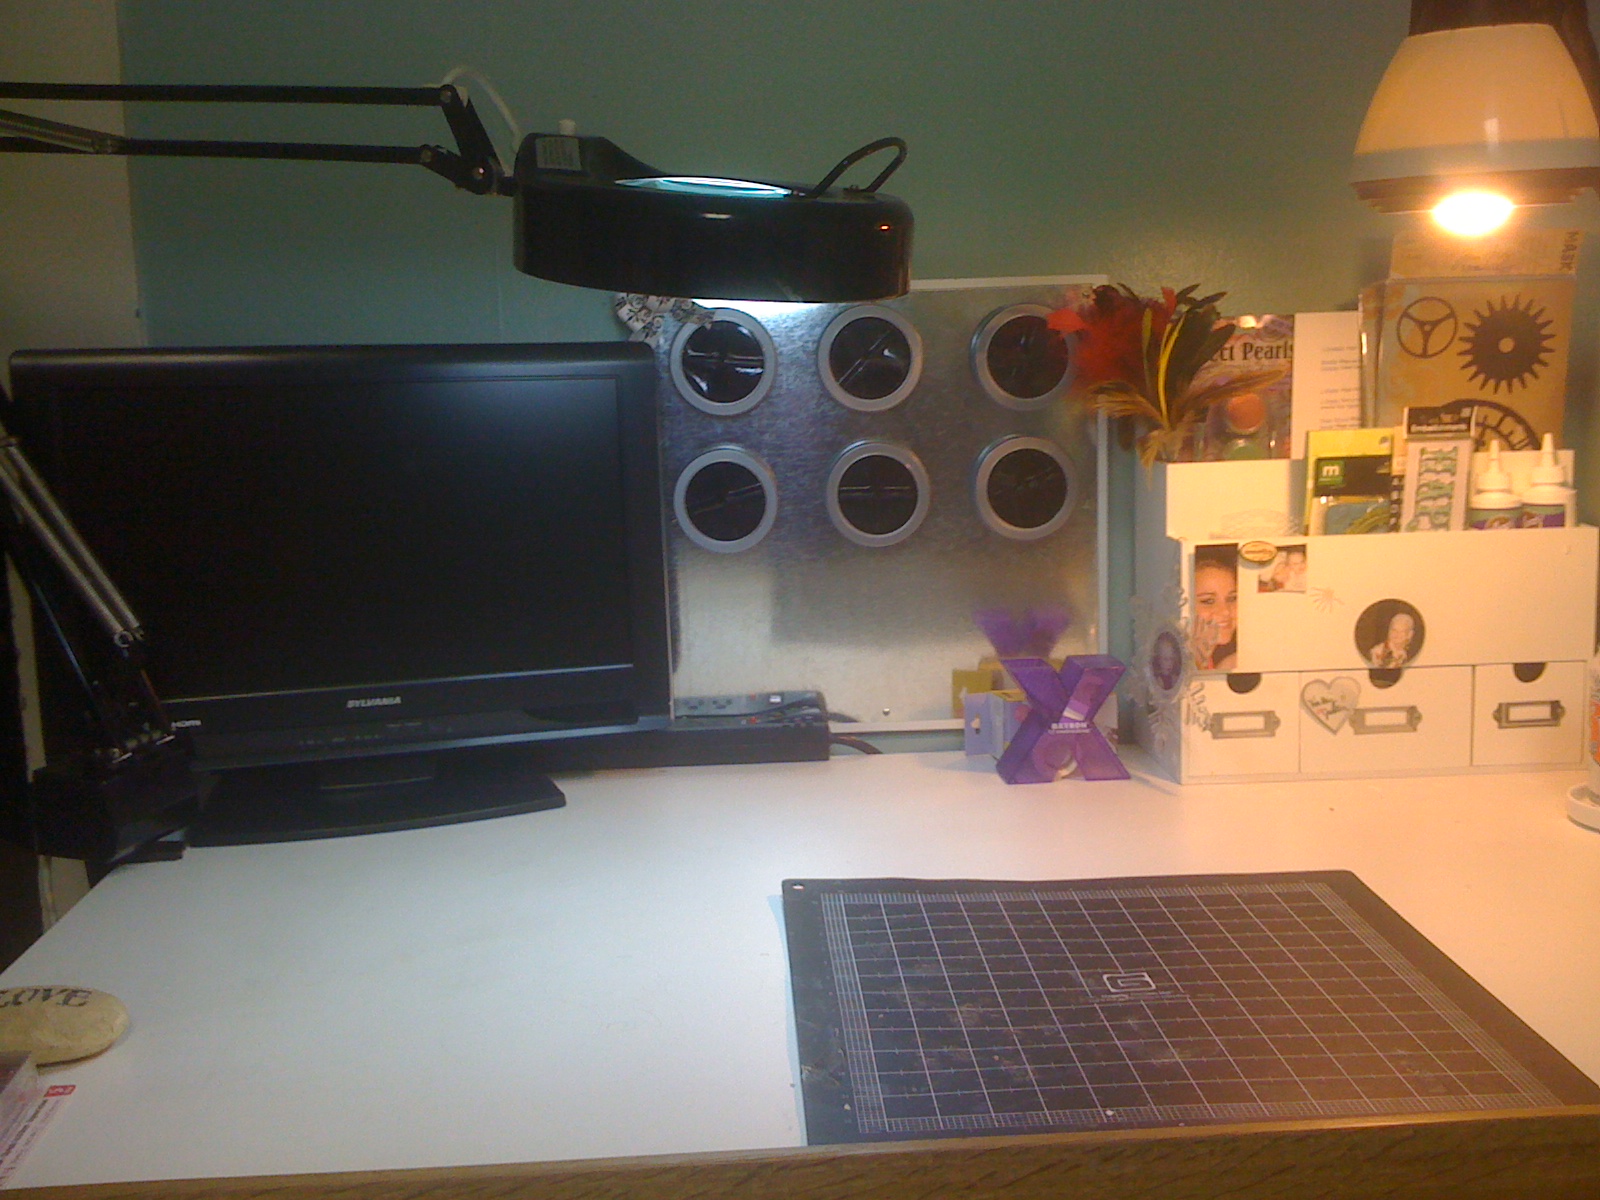 This is my main workspace. My tv is here (it will eventually be mounted to the wall) and I have a DVD player and my Direct TV box is on a small table under the tv. The silver board on the wall is magnetic and the little metal containers will hold small brads, buttons, etc. (I purchased them at Michaels as well).
 When you turn around from my main workspace, this is what you find...another table which olds my paper trimmer and a spice rack which I altered to hold buttons and flower centers plus my scissors. It was perfect for this and I purchased it for $2 at a garage sale! great find!
  This is my rubber stamp storage...again I purchaased the shelf unit at a garage sale for $2! and painted it white. PERFECT!
 This is my Cricut station...
 And my computer/printer station.
 I bought about ten of these iron hangers at Hobby Lobby on clearance for $1.20 each and I will be using them to display favorite pages across a blank wall.
  Here is my latest addition...my Stickles and Alcohol Ink storage. I bought a Scrapbook plastic case at Michaels for $8.99 and an insert that fit perfectly in the case (the inserts are meant for the white block storage drawers sold at M's)...it was only $3.99~oops! Looks like I need anothe one!
That's most of my room. There are a few other things haven't shown you but when I get pics taken, I'll post! Thanks for looking!
Friday, March 19, 2010
We bought a home!
My hubby and I were married in December 2008 and have been renting and throwing away much to much of our hard earned paychecks on rent payments. Tuesday, March 16, 2010 though, all that changed. We bought a house! Our new home was built in 1940, has high ceilings, lots of open spaces, and needs lots of TLC. We are renovating this old home and are extremely excited about it. The home is a diamond in the rough and we are gathering ideas, spending lots of time in our local Home Improvement store. I'm looking for ideas on paint colors, storage solutions and home improvements for every inch of our home, from you!, my artist friends! Here is a photo of the first (and only so far) room I've painted. It's the living room and the color is called Sparkling Lake. I love how the cool, fresh color plays off of all the white trim. There is a sitting room off of this room, only seperated by two sets of columns, so I'm thinking I should paint it the same color as the living room. And the dining room is off of that sitting room...All three of these rooms can be seen from each other. I bought red paint for the dining room (I love contrasting colors), but now I'm having second thoughts about these two colors together. I'm open to any ideas, suggestions, words spoken from experience from any of you who have renovated an old home...Bring it on! This is going to be FUN (aside from the hard work, that is! haha!)
Here's my living room:


Here's my living room:

And below is the paint swatch I got from Lowe's and where I got the idea for the Sparkling Lake color (which I LOVE) and the red paint for the dining room. My plan is to do my own art canvasses (not the same design as shown here, but something in my own style). Anyway, I planned to make pillows with the red and buy a red chair or ottoman to bring the splashes of red into this room, making the three rooms flow together hopefully. I'd love to know what you all think before I get my paint roller and that red paint on the walls!

Thursday, March 4, 2010
A Special Tweet!

I stamped the images on as trip of white cardstock, used colored artists pencils to fill in the background and the yellows and blues on all the papers. I used ColorBox ink to ink the edges of the scalloped blue paper, which I tore with a paper edge tearer by Fiskars. Once I had all the inking and colors done on the papers, I glued the scalloped paper edges to the white strip, then clued that to the music notes paper (which is from the Paris Nights collection). I then added the flowers with brads, made the tag out of the paper scraps left from the can, tied the ribbon and strings on and voila..done! It was fun to make! here's a couple of closeups. Thanks for looking!:

Saturday, February 27, 2010
Faithful Friend


I took this picture of my pomeranian Gabby when we got several inches of snow in early January. We have an Alaskan Malamute also who LOVES the snow and cold temperatures, but when we put Gabby outside she seems to get a bit miffed! LOL
Now about the layout itself...I used paper I had in my massive stash (but I need more, don't I?). The heart was cute from my Pagoda cartridge for my Cricut Expression. The brown flourish is actually the tail of the heart, although it's hard to tell from the photo. I made the flower myself with tulle and a giant brad...(I cut 8 layers of the tulle into circles, then cut a small round piece of cardboard - the packaging from the Prima flourish - and attached it to the bottom of the flower with the brad and a bit of hot glue. Once the brad is in place and the cardboard rounder, which is just slightly bigger than the brad, has a bit of glue on it, I squeezed the tulle around it to kind of scrunch the flower. That gives it more dimension...the last step is to turn the layers of tulle individually in a twisint motion around the brad, which causes the little 'folds' and curled look. Voila! handmade flower that cost about 30 cents to make!
The fan cutouts above the pic were punched with Martha Stewart Daisy Fan punch, Stickeled with Vintage Photo Distress Stickles glue (the heart also got the Stickle treatment!). I added the feathers with a bit of Tack Over and Over glue (Aleen's). I stamped the doily in the pp with ColorBox chestnut ink. Thanks for looking!
Friday, February 26, 2010
As Time Goes By

Here is another page I've been dying to create. I used a sketch from my crazy-talented friend Alda Stevens at Pages in Time to create the basic design.
I met my Dad for the first time since I was 5 years old when I was 29 years old. He had been diagnosed with cancer and told his family he wanted to meet his kids before he dies. Long story short, they found us. Soon after me and my two siblings travelled the few hours to his hospital room. As we walked in, there wasn't a dry eye in the room as he quietly called us each by name as we approached. It amazed me that he knew who was who even though he hadn't seen us in more than 20 years. I spent my entire life thinking my Dad didn't want me, didn't love me, had never looked back afer he and my mom divorced. After our meeting I discovered that he had spent his life looking for us, only to be stopped by my mom each time he got close. We met in March 1990 and he passed away exactly one year to the week later. Meeting my father and getting to know him changed my life forever.
I treasure this photo of my Dad. I've heard stories of his big personality and flirty ways and this picture epitomizes that image of him for me.
Sweet Sweet Prince


I created this layout of my sweet grandbaby Rafe after three weeks of carrying it around in my head waiting for the moment when I could create it without being bogged down by emotion. I intend to document the life of this wonderful blessing to our family through my love of scrapbooking and photography and the written word. The hidden journalling reads:
Your doctors told us you were blind three weeks ago. Although we knew you had vision problems, we didn't expect this. I cried for a solid week because I couldnt understanbd why our sweet little baby Rafe would never see what his own mother's face looks like, or how the sun seems to sink into the horizon at sunset, or how some flowers look as delicate as they smell. You, however, are such a joy, such an amazing blessing. As unimaginable as all this is, your smile and little giggles make us all know that you'll do just fine. I know you'll "see" through our eyes and we will learn untold life's lessons from you. I can't wait until you get back to the states so I can see you and hold you again. I miss you!
I used white cardstock for the background, K& Company Letter Pearl Embossed Velum for the foreground paper, Marth Stewart Daisy Fan punched the edges of the photo mat and the edges of the foreground paper. I used a scalloped edge paper turned design-side down, with Smooch Pearlized Accent Ink to give the edge a bit of dimemnsion. I attached eyelets and Fiber Accents String to make the bows. The punched border by the pick and the checkerboard cutout was sprayed with Smooch Spray to give it a glimmer!
Subscribe to:
Posts (Atom)